solar-citrus:

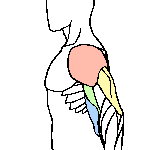
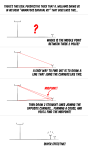
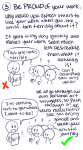
I’ve received a lot of letters from artists asking to check out their artwork and their blog, and I’ve noticed that a lot of them openly write unhealthy amounts of negative comments about their artwork, it was super depressing, honestly.  😦
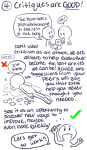
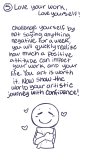
Confidence plays a very very important role as an artist, it’s what helps us learn and grow without the constant feeling of doubt and jealousy!  You are a unique individual who must go down your own unique path, and as scary as it sounds, you can’t rely on others to hold your hand all the way through.  You are the only one who can get yourself to where you need to go, and beating up your artwork is not the way!  Trust yourself and your abilities to make a change, and you can do anything!!

Love your art, love yourself!

momochanners:

mooncalfe:

red-winged-angel:

moanochrome:

I always cry myself to sleep when I make this mistake but a friend recently taught me how to do this and it blew my mind so I thought I would share with you guys.

Uuuuuuh reblogging this to save LIVES

god i could have used this the other day. 😡

*tears*

songbirde108:

hamaonoverdrive:

anatomicalart:

piss-hubbo:

FUCK THIS I SPERFECT, IT SHOWS THE ARM PRONATING AND ALL THE MUSCLES SHIFTING ALONG WITH THE WRIST

IT EVEN HIGHLIGHTS THE ULNA BONE  

HEY THIS IS THE ULTIMATE ANATOMY REF, FUCK THOSE MISLEADING TERRIBLE FUCKING “ANATOMY” TUTORIALS THAT GOEAS AROUND TUMBLR, THIS IS ALL OYU NEED, LOOK AT THE LATISIMUS STRETCHING OVER THE SERRATUS, THE PECTORAL MUSCLE MOVESUPWARDS AND OVER THE BICEP AND EXTENDS  ALONG WITH THE ARM THERES EVEN THE CORACOBRACHIALIS;. AAAA OMFG I’M SO HAPPYYYYYY

Admin Kin here: This is one of the most helpful references in our library, but I wondered if any of our followers might be able to help identify the color coded muscles? It would be great to be able to know what is what while practicing from these sheets!

Sure, @anatomicalart! The colors get reused between the arm/back angles so I’ll separate them.

Arm view:
Red = Deltoids (all three heads are in one color)
Blue = Latissimus Dorsi
Green = Biceps Brachii

Yellow = Triceps Brachii

Forearm:
Red = One of the wrist flexors
Blue = Brachioradialis

Back view, left side:

Red = Deltoids (all three heads are in one color)

Blue = Latissimus Dorsi

Green = Infraspinatus, Teres Minor, Teres Major

Yellow = Trapezius (all groups one color)

Back view, right side:
Red = Supraspinatus
Blue = Serratus Anterior 

Green = Rhomboids
Yellow = Levator Scapulae 

Not an artist, I just like cool stuff.

How to Achieve a Painterly Look in Photoshop

lynaiss:

image

If you used Photoshop for a while, you know that it is slightly harsh on the colors. It blends them in an odd way, sometimes not quite like how traditional paint mixes. It is also difficult to achieve a nice color range without going over into extremes and overly saturated or contrasted look. Overall, it’s hard to avoid that strange ‘digital’ look.

So, how to avoid that and not have the piece look muddy? Also how to make colors seem rich without the piece looking like an unicorn barf? Short (biased) answer: Slowy layer colors in various Layer Modes to build your piece up. Almost like the old masters, right?

I’m absolutely certain there are other ways, but as someone with classical training in painting, this seems the closest to the real thing to me personally. Below I went over all the steps I do to achieve the painterly look and color range I want.

*The screenshots of color picker window and the green squares mark the color range I use in each step. Note, however, that the hue is NOT the one I used in the piece.

Keep reading

Mysteria Academy Rosetta (“Manatta”) by Kakage: Coloring Guide

maxiburger:

In celebration of his 30.000 follower milestone, Japanese artist Kakage tweeted a step-by-step explanation on how he colored a recently posted picture of his favorite character Rosetta from Granblue Fantasy.
By request of a friend, and with Kakage’s permission, I’ve translated the steps so they may help other artists who want to learn from his process. The PSD-file with all the individual layers is available for purchase through Kakage’s pixiv booth. For more content, visit his twitter or pixiv gallery!

(Edit: I originally posted the pictures from imgur uploads because tumblr tends to fuck up the image quality, but somehow this caused the pictures to not show up in reblogs, so I reupped them directly into tumblr. If the quality turns out bad, you can still check them on imgur)

jltillary:

ageekyreader:

flynneware:

WE FOUND IIIIIIIIIT OMG Me and some people have been searching for this image for a couple months now xD Woke up to see someone found it and told me! So happy! Thanks @naariel!

To all my artist friends, this one’s for you ❤ 

Ooo – this is a really good reminder for writers too! @merigreenleaf Looky! This is why sometimes I tell you that you are doing better and you are like, “but there is so much wrong here!” We are at different seeing places and your writing really is getting better. Plus I haven’t read it as many times as you have lol

YooooooOOOOOOOOO

art cheats

frostje:

hello i am here today to not lose track of the art cheats i have discovered over the years. what i call art cheat is actually a cool filter/coloring style/way to shade/etc. that singlehandedly makes art like 20 times better

80’s anime style

glitch effect

glow effects

adding colors to grayscale paintings

foreshortening ( coil )

foreshortening ( perspective )

clipping group (lines)

clipping group (colors)

dramatic lighting ( GOOD )

shading metal

lighting faces

that is all for today, do stay tuned as i am always hunting for cool shit like this